
We take pride in dedicating time and resources to education around all things 3D. One thing that we especially love has been working with teachers and professors over the years on how to incorporate 3D modeling and printing in their classrooms. Educators at every level deserve a partner that will work side by side with them to set up, run, and maintain 3D printers in their unique environments. We have worked with educators ranging from elementary to university levels on how to set up, run, and maintain 3D printers. As always, software assistance is included in our services. Our designers are experienced with different 3D modeling programs ranging from TinkerCad (which is great for beginners/ young students) to Solidworks (an industry standard and used by professionals all over the world).
Are you or do you know someone who may be interested in bringing 3D capabilities and exploration to classrooms? We’re here to help every step of the way.
Day 1:
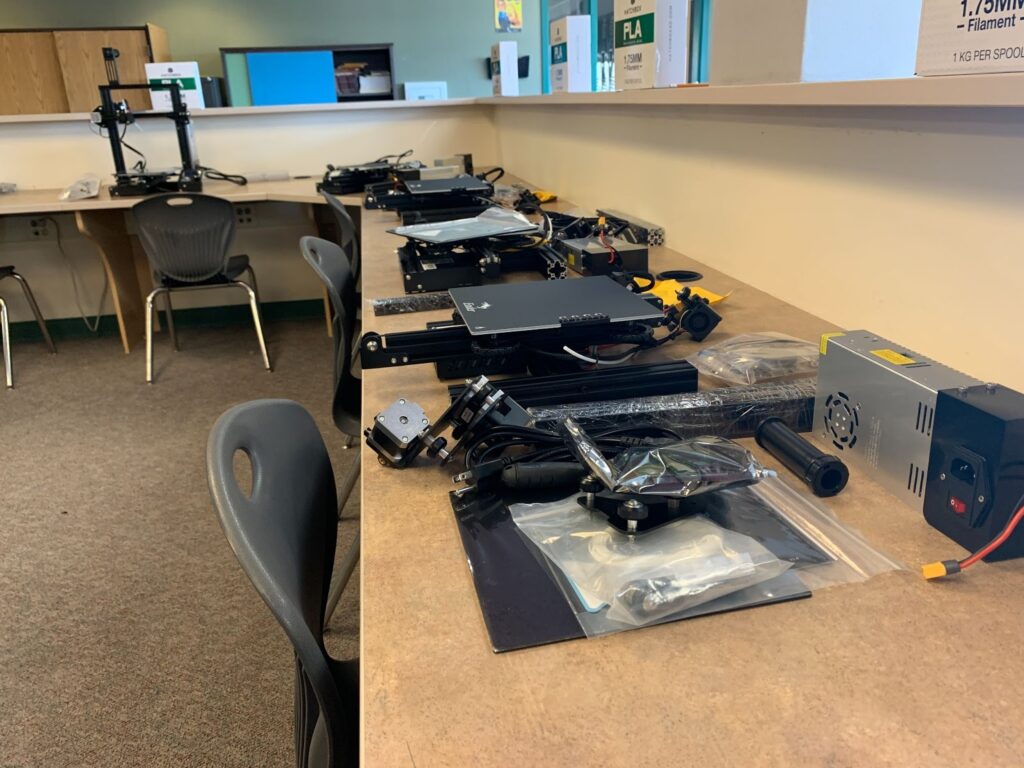
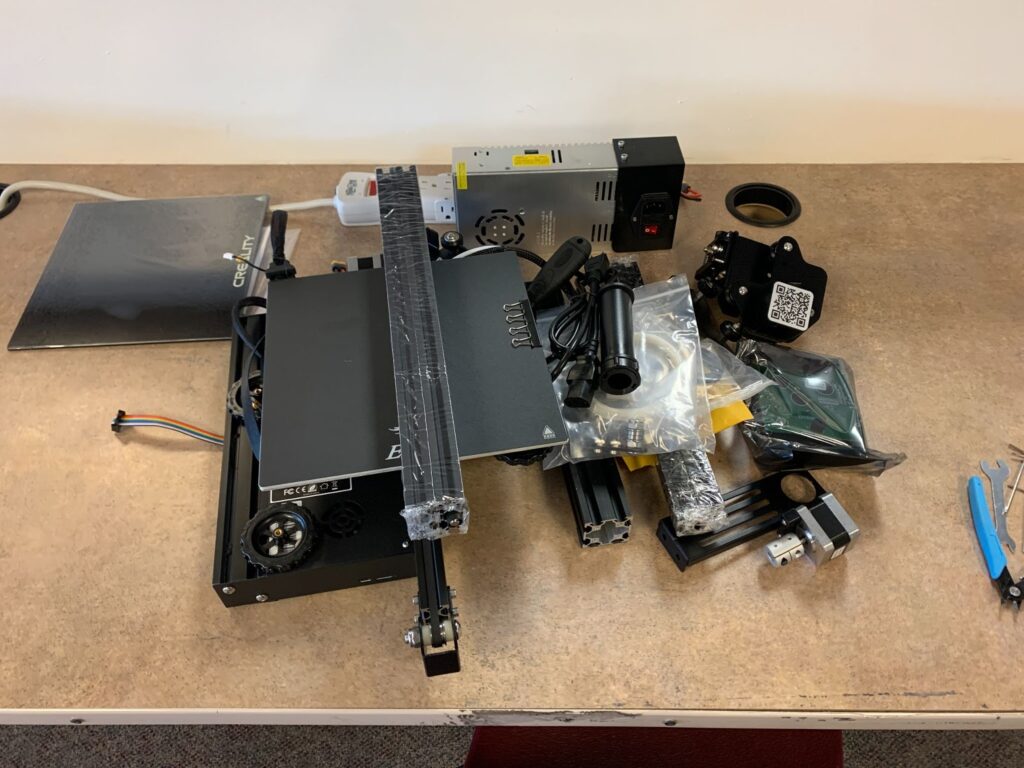
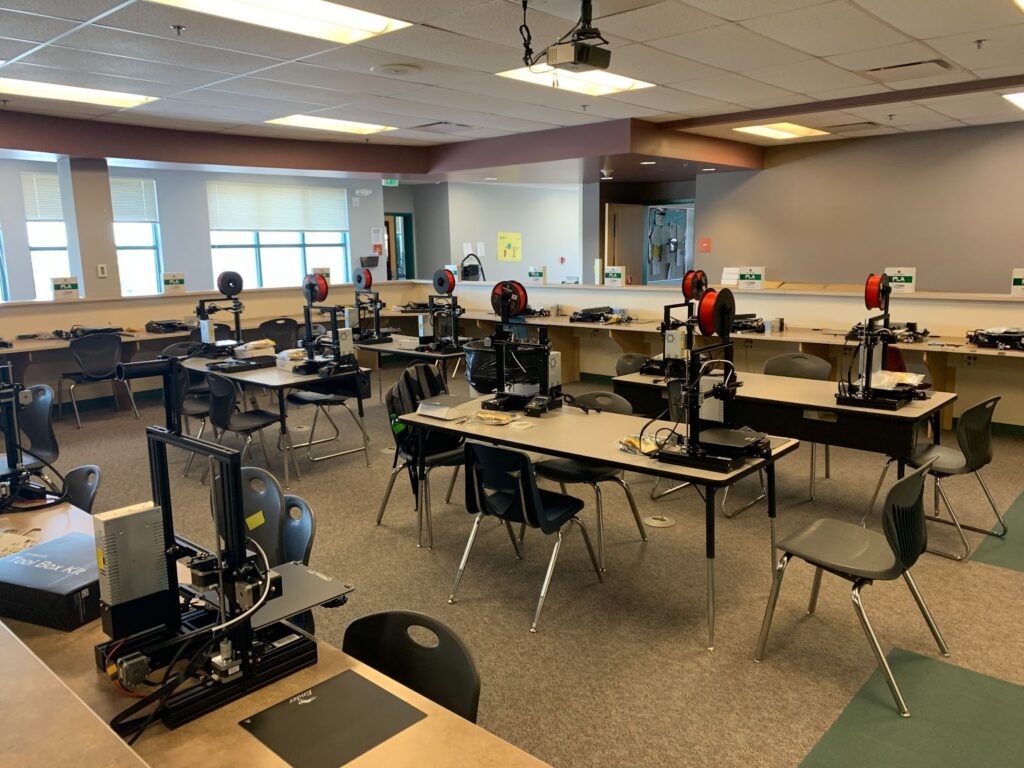
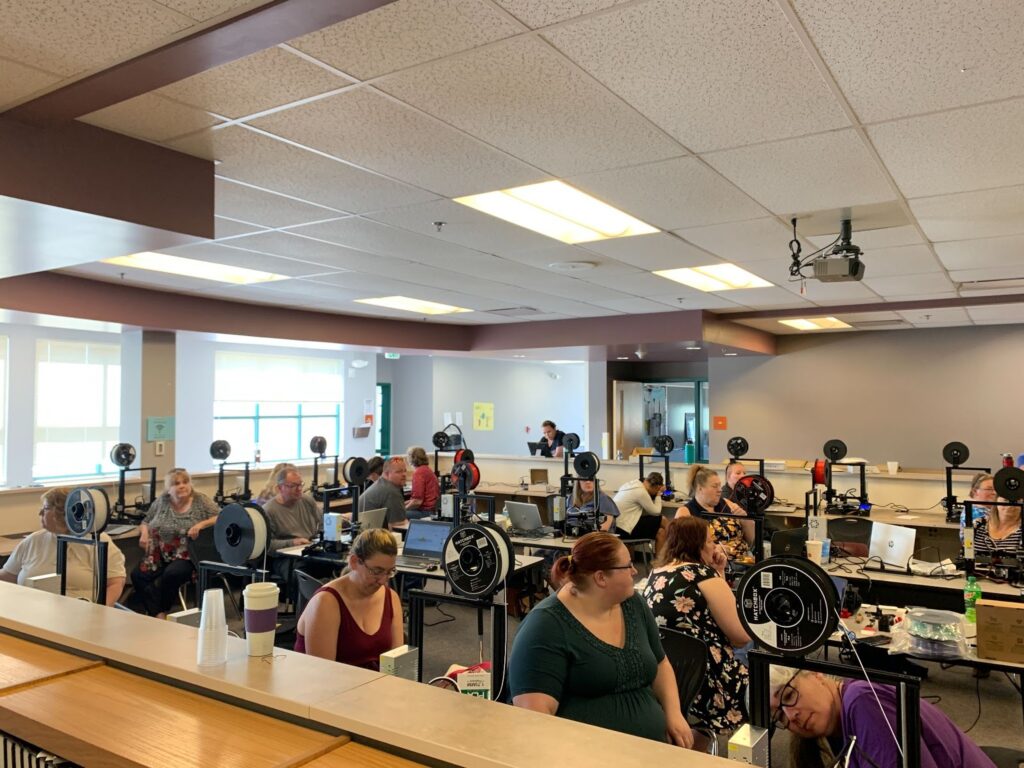
We always dedicate the first day to completely set up all printers. Recently, we hosted a two day Professional Development workshop in Walsenburg, Colorado. The challenge was to build 24 Creality Ender 3s in a single day. Mission accomplished! Our experienced team member Justin worked with Walsenburg High School educators to form a 3D printer assembly line to get all 24 printers successfully set up and calibrated. This then allowed educators to understand the setup and calibrations process for future reference.

Day 2:
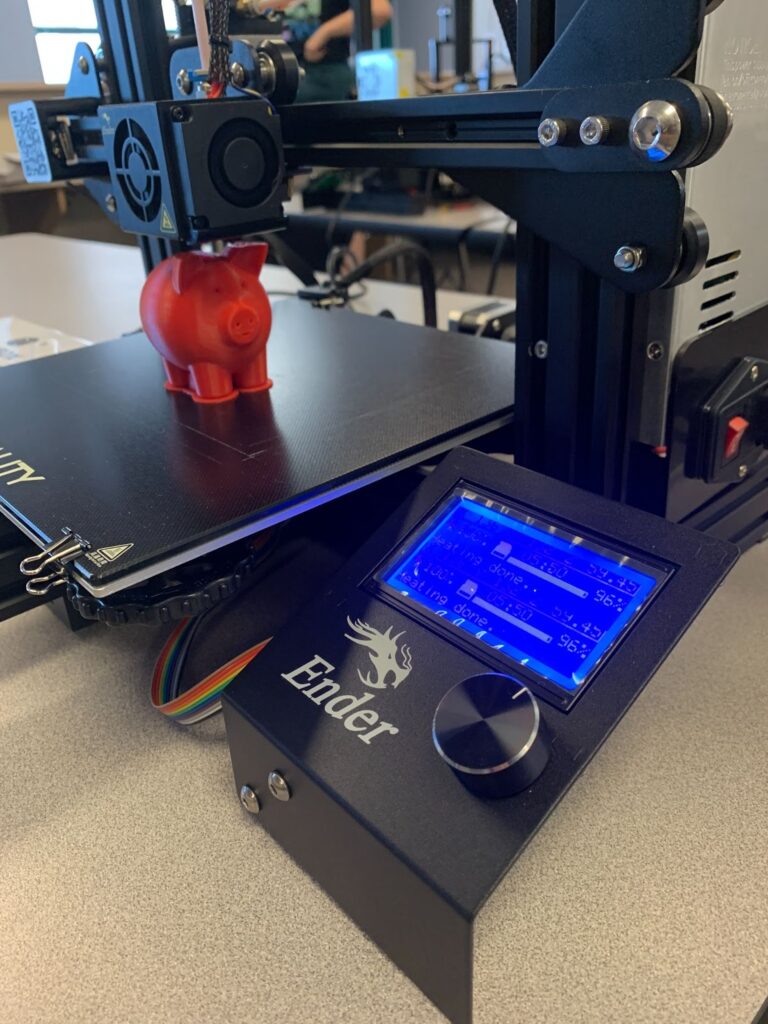
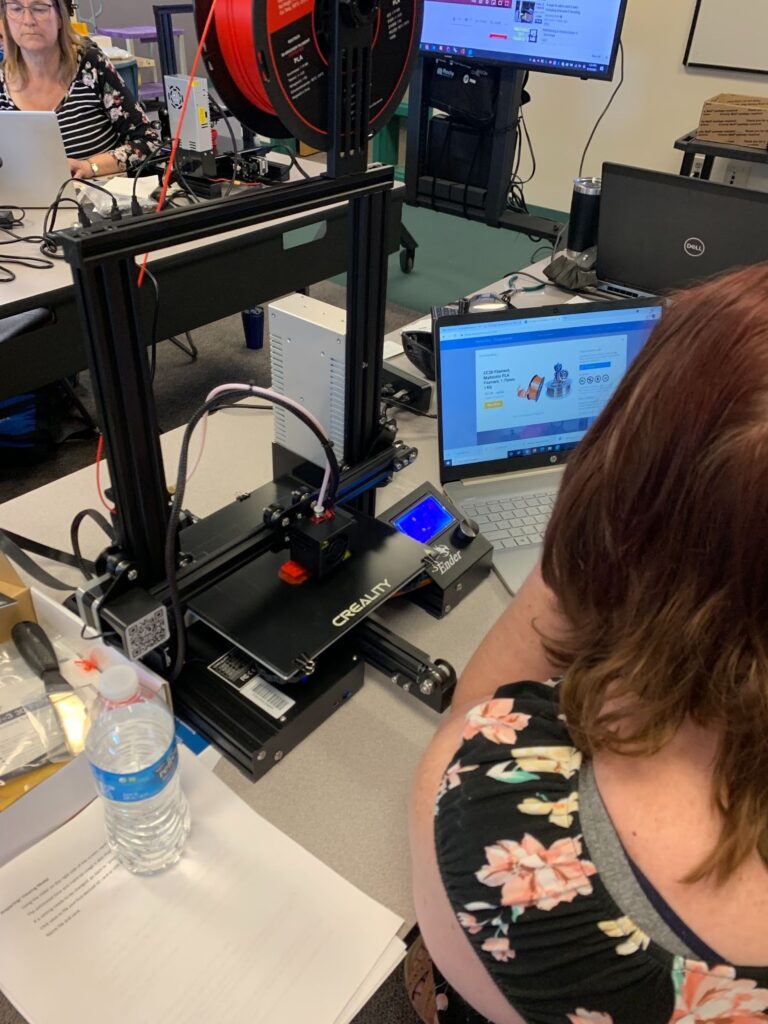
The fun really begins on the second day when the whole class is engaged. After exploring the assembly and anatomy of the printer, we help with basic setup. Then, we work together with the class to level the bed and learn how to load filament into the printer. This is when we can do a test print together! The test print is always included with our services and machines to ensure that the printer is assembled and set up for the best quality prints for your classroom.
On the second day, we also introduced software required to start the printer. For example, modeling programs can easily make the form while slicer programs convert the model into code that the printer can understand. We usually use TinkerCad and Cura in educational environments for ease and efficiency as a starting point. They are also free!

Day 3:
When the magic really happens is when the class takes the information from the last two days and uses TinkerCAD software to make the model that they want. Then, we can transition into Cura software to slice the model for the printer. Time to start printing!
While printing, the class can turn to common troubleshooting issues as well as general maintenance issues during a Q&A session. When the machine is busy printing, we use this time to address any questions that come up from educators and students alike.
When the print is done, we demonstrate how to remove the print and filament from the printer. Then, we work with you on how to transport and store that particular printer.
At the end of the day, the classroom is well versed in how a 3D printer works, operates, modeling, slicing, and 3D printer maintenance.
Results
Successful implementation of new technologies in 3D printing is an investment that deserves the highest quality outcome. We ensured that every participant in the workshop had not only a working printer, but the confidence to use them to integrate them into curriculum goals. We work with educators and students to take advantage of all of the free design software that we introduce. In the end, Walsenburg designated their own student tech to work with us in an ongoing relationship to handle printer maintenance and troubleshooting– we’re always a phone call away!
Introducing new technology into the classroom is an ongoing process and a real challenge for educators. You need the right mix of new technology, training, and industry knowledge. Most of all, you need a team of experts that don’t leave you hanging after a workshop like the one that we’ve covered. Our mission to give educators and students the tools and knowledge that they need is very important to us and we look forward to continue working to bring new technology to life in the classroom!
To keep up with our latest projects, sign up for our newsletter, check out our new site, or contact us at project@the3dprintingstore.com
Or call at +1 720-443-3733
Advances in technology and manufacturing processes mean that companies can have user-specified designs for everything from custom logos, to in-between sizes, special colors and more. When those options are not readily available, they contact us to discuss the options. Additive manufacturing one-offs and customization are not just possible, but encouraged. Realizing the benefits of 3D printing, Vantage Homes reached out to 3DPS to customize their Mercedes Metris work van emblems to improve their brand recognition and stand out amongst their competitors. The customer considered other options for the customized emblem, but they were unsure of how to find a durable material or how true to the logo that the model could be made. They came to 3DPS to create an original emblem that matches their branding. It also needed to fit nicely and securely on the car while being strong enough to be on the exterior of a vehicle.
Recreating the emblem started with the original part. Using the original part, our design team was able to get the proper measurements. The customer provided a .DXF file of the precise recreation of the logo. .DXF is a common image format used in design and engineering drawings. Creating the custom emblem required using design software with the measurements of the original emblem attachment points. The final model used the frame with the new logo from the customer.
Once the final design was completed for the logo, the customer gave approval to print the part. The 3DPS team selected the right print technology and material; then, with customer approval, the part was printed using the Carbon in RPU70. This material is similar in strength to ABS, but is more UV stable. Additionally, with Carbon print technology it created a very smooth surface finish similar to injection molded parts. The finished print was a beautiful strong part that is sure to draw attention.
The final touch to the customized emblem was adding paint and installing the new emblem. The new emblem looks stunning and is currently out on the road. Keep your eyes out for these awesome customized logos!
If you would like to improve your marketing by creating customized artwork, functional pieces, giveaways, branding, and more, then reach out to project@the3dprintingstore.com! Our expert team of designers, scan master, and print operators is here to make sure all of your projects come out with amazing results.
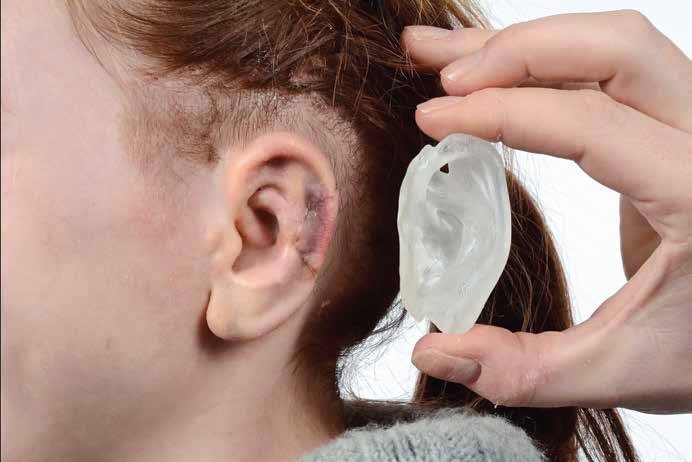
Making 3D Printed Implants for Children with Ear Deformities
Over 100,000 children enter the Royal Hospital for Sick Children annually. Located in Edinburgh, its facilities attend to children like Ellie, who suffers from a congenital malformation of the ear’s elastic cartilage. Doctors call this “microtia,” a medical term that translates from Latin as “abnormal smallness of the ear.” For some with this condition, the pinna (or external ear) can be so small as to appear practically non-existent. And due to the underdevelopment of both the middle ear and external canal, microtia is o en accompanied by some level of hearing impairment. One out of every 6,000 babies are born with this condition.
Fortunately, Edinburgh is home to Ken Stewart, who heads the local Ear Reconstruction Service of Scotland. There he has been fine-tuning ways to perform reconstructive surgery on both children and adults afflicted with ear malformations.
For years, Ken had employed a number of techniques for approximating the varying circuitous designs of his patients’ ears. The most popular method is to borrow cartilage from the patients ribs and to carve this into an ear shape. In 2014, he began investigating 3D imaging solutions in an effort to streamline the pre-operative procedure for ear reconstructions. Ken admits, “With all the technology around us we need[ed] to improve this workflow.” Though Lothian NHS, where Ken is based, had already been using 3D imaging systems to design prosthetic limbs and carry out medical examinations, they wanted to improve the details of their reconstructed ears.
It was then that Ken turned to Patrick Thorn & Co., Artec’s UK gold partner. Drawing from his extensive experience with designing and re-designing ear prosthetics and implants, Ken remained skeptical that Artec’s state-of-the-art scanners could effectively 3D render the human ear. To prove to Ken otherwise, Patrick decided to produce a range of sample replicas to demonstrate Artec’s high-resolution imaging capabilities. Patrick arranged to have the ears of his neighbors and grandson scanned. Following a few imaging modifications with the help of Leios Elaborations Scanning So ware from EGS, he ordered the samples printed on the Roland ARM-10 3D Printer.
Thrilled by the results, Ken and his team knew that they had to have an Artec Spider – a high-resolution 3D scanner that is well-suited for capturing images of deeper surfaces within the ear canal as well as around the area between the ear and the head.
With the successful fundraising efforts of the Sick Kids Friends Foundation, The Royal Hospital for Sick Children purchased an Artec Spider, with Artec Studio and the Roland ARM-10. In a single afernoon, it was installed, and on the next day, hands-on training followed. Ken remarks, “With the training and additional notes Patrick provided, we can now use the solution from scanning to 3D print with relative ease. The model is then sterilized and utilized in theater to improve the accuracy of our surgical reconstruction”.
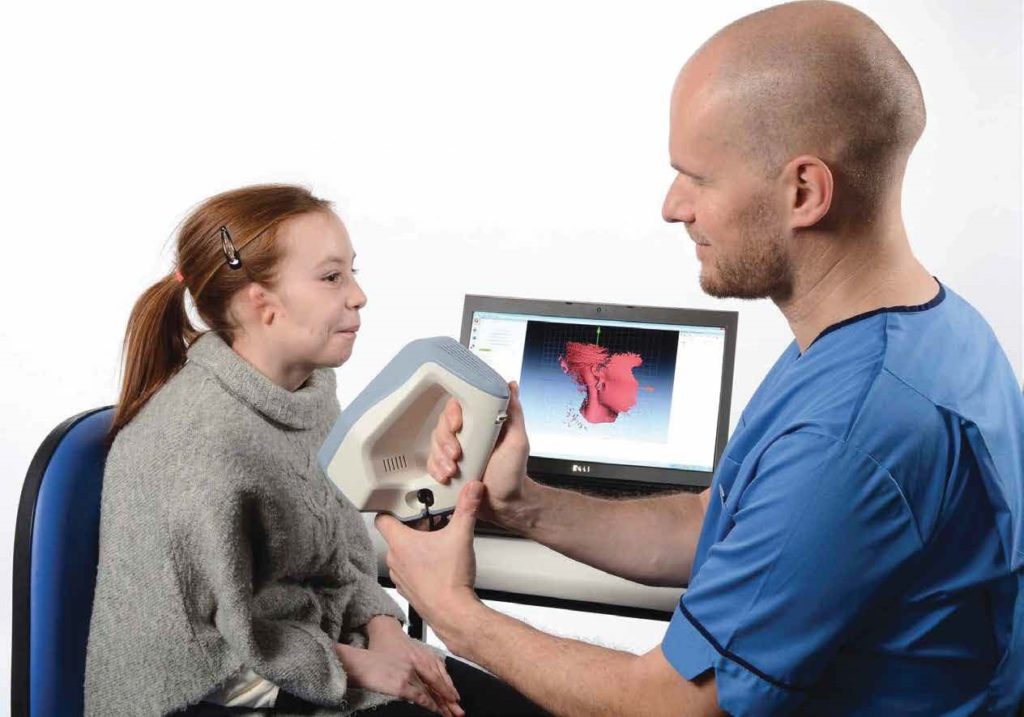
Integrating Artec Spider into Ken’s ear reconstruction practice has both simplified and systemized the ear-building process. Once the initial consultation with patients concludes, they return to the hospital to have their unaffected ear scanned. In Ellie’s case, because she was diagnosed with bilateral microtia (meaning both ears are affected), the ear of her sister, who does not suffer from microtia, was scanned instead.
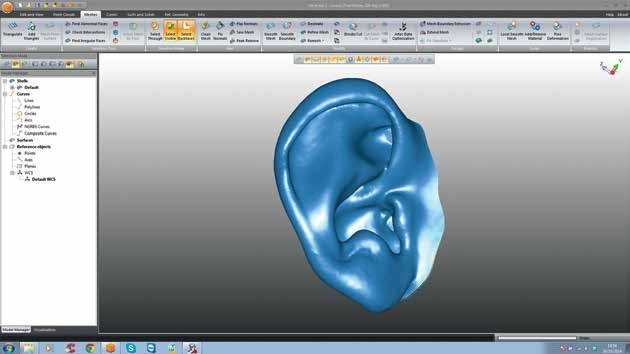
Sometimes an image of the affected ear is also taken for reference. During the scanning, Artec Spider gets to work on capturing in striking detail the complex structure of the outer ear, and then probes deep into the ear canal, collecting further, invaluable visual data. A erwards, the images are uploaded into Artec Studio, where they are swi ly aligned, and fused to construct an impressive 3D digital model of the ear.
During the retouching stage, Leios is used to check the ear’s surface, remove any unnecessary elements, and allow for skin thickness by applying an internal offset. Once all the structural and cosmetic alterations have been finalized, the resulting image is mirrored. Therea er, an electronic file containing the images is delivered via a shared drive to a laboratory and loaded onto the Roland MonoFab Printing So ware, in which alignments are performed. All that’s le is to press “Go” to start 3D printing.
They are then sterilized, sealed, and sent to the operating room to serve as 3D templates for ear reconstruction.
With the help of advanced imaging solutions from Artec 3D, surgeons like Ken can rest assured that they’ll never have to approximate models for the prosthetics and implants they create.
Special thanks to Ellie and her mum for allowing us to share this success story.
This content was originally written by Artec 3D
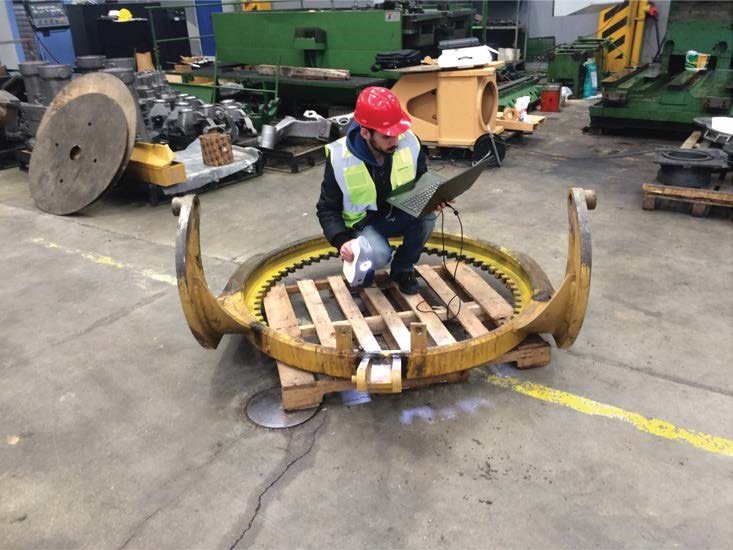
Artec 3D Scanners: The perfect investment for reverse engineering
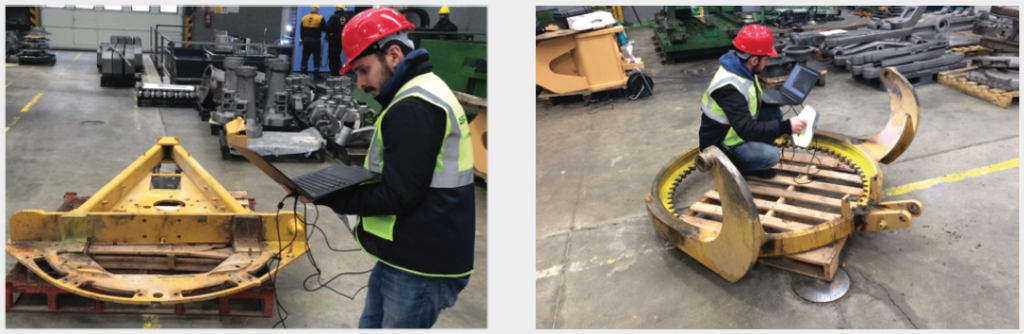
An international manufacturer and distributor of construction machine spare parts wanted to replace old parts with new ones milled from 3D models made by the Artec Eva 3D scanner.
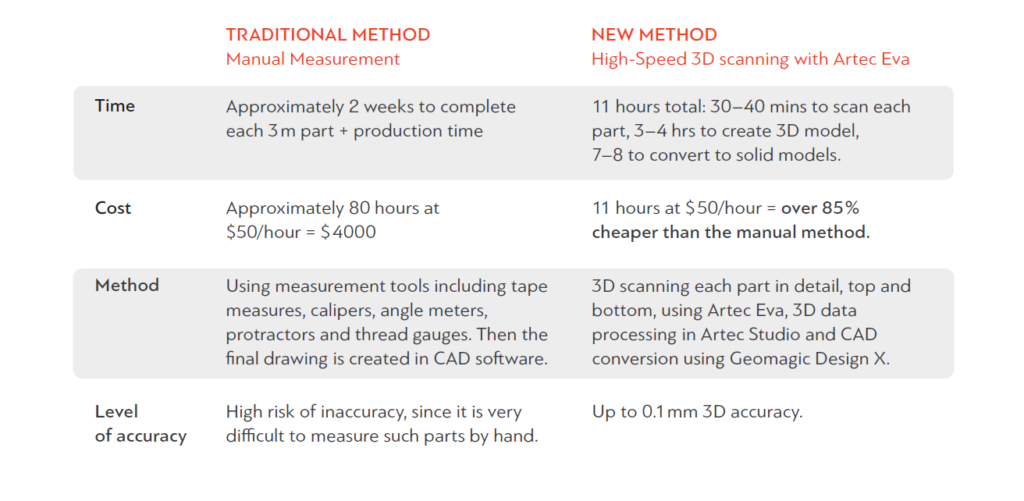
The company achieved over 85% reduction in time and cost using 3D scanning

Scan to CAD with Artec Eva, up to 0.1mm 3D accuracy
It was 85 % faster and 85 % cheaper to make these parts ready for manufacture, compared to using traditional measurement tools.
1. 3D scan all sides of your object.
2. Process the 3D data in Artec Studio and create a high precision 3D model.
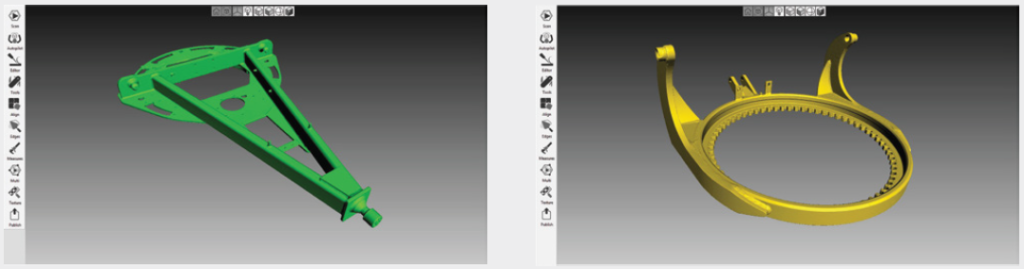
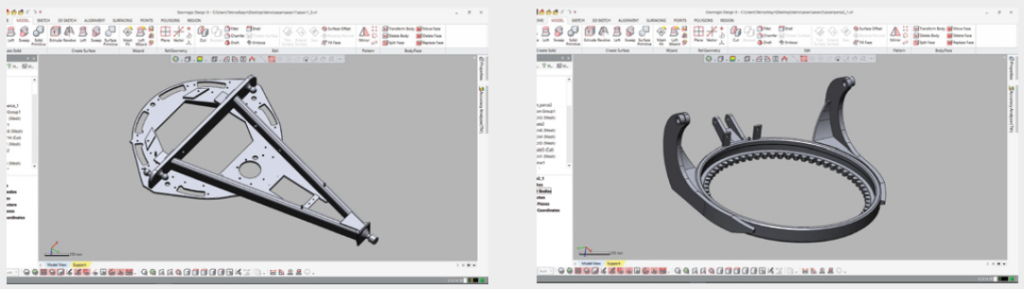
3. Convert the mesh model into solids.
Other advantages of using 3D scanning: Accuracy
Measuring these kinds of large parts manually is very difficult, lengthy process and is likely to result in an inaccurate model as a result. 3D scanning, however, is much faster and simpler, and perhaps most importantly, results in a high precision 3D model which you can manufacture with confidence.
3D printers gained the attention of a broader audience in the second decade of the XXI century with a few open source project which offered affordable additive manufacturing machines, simultaneously sparking a market for future 3D printer manufacturers. Since that time 3D printers evolved, even surpassing the function of 3D printing. Nowadays, thanks to multitool 3D printers like the ZMorph VX, users can create complex, multi-material projects, including a PCB board. With this use case, we’d like to show you how advanced are multitool 3D printers today. The project you’re about to see wouldn’t be possible with a typical single-purpose 3D printer.
Solution
In order to make a fully custom drone we used all of ZMorph VX fabrication methods. 3D printing with ABS was used for the electronics casing, propeller guards, and landing gear. From a 3D printing toolhead we switched to Laser PRO toolhead to etch a PCB design on a PCB copper laminate plate. Next, a CNC PRO toolhead was used to cut the frame from lightweight and sturdy Dibond composite, and also to cut out the form of the PCB from the previously etched copper laminate. Then we took some standard electronics to make the drone “alive”, like sensors, main processor, battery, radio control remote. Finally, we made final post processing touches by painting some elements of the drone.
Result
We combined all three ZMorph fabrication methods: 3D printing, CNC, and laser. We used some ABS filament, Dibond, PCB laminates and some electronics, all worth around $100. This multitool 3D printer allowed us to make an awesome looking and functional drone within a desktop workspace. The same process can be used for making prototypes, showcase models and even low-volume production – proportional to the amount of owned 3D printers. A drone is only an example because the range of ZMorph’s possibilities is really vast – for more check out our catalog at zmorph3d.com/catalog. 3D printers came a long way!
Client: SAIC Yanfeng Co. Ltd.
Industry: Automotive
Application: QC Gauge
Material: PC
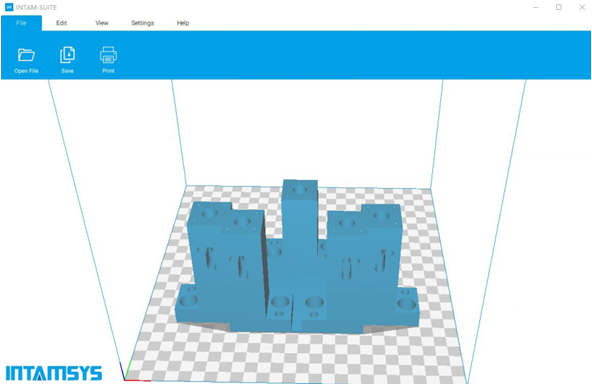
3D Printer: FUNMAT HT
SAIC Yanfeng is a leading automotive seating company in China. The company is a preferred partner of SAIC General Motor, SAIC Volkswagen, Changan Ford, Changan Mazda, Dongfeng Nissan and JAC Motors. SAIC Yanfeng employs over 17,000 staffs at 52 facilities nationwide.
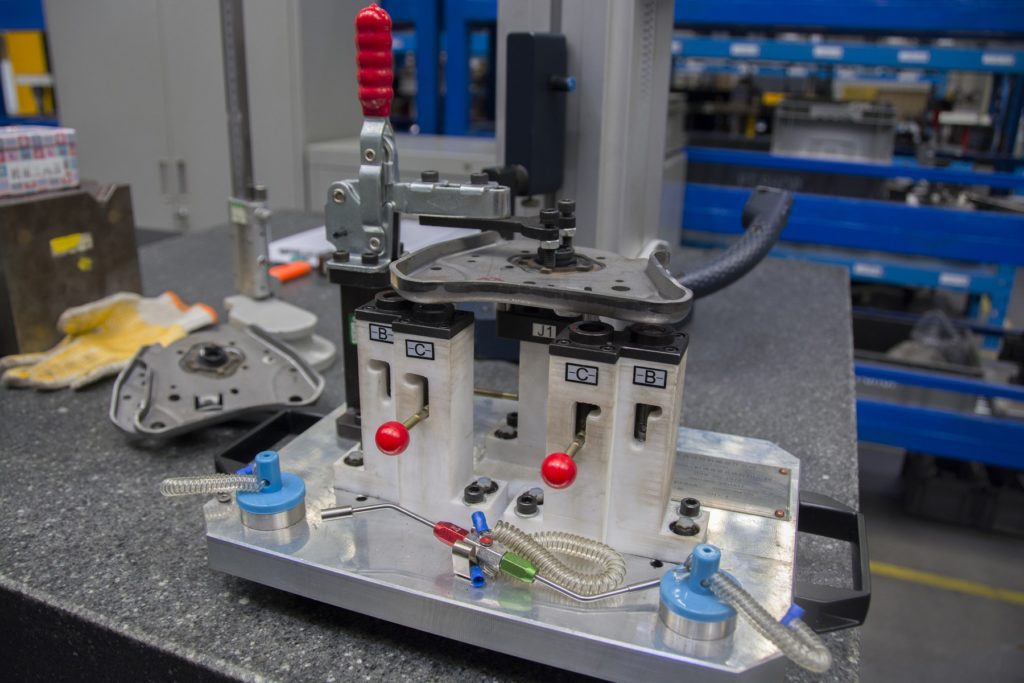
Gauge is essential to product quality control standardization in automotive seating manufacturing. The design quality of a gauge can directly affect productivity and quality of final products. Engineers at SAIC Yanfeng use a gauge to inspect size and quality of automotive seat components. Generally, cost of developing and manufacturing gauges with traditional machining processes is high due to the requirements of high-level gauge customization and low-volume production.
At the factory floor of SAIC Yanfeng, the functional size control units (in white color) of the gauge are 3D printed with INTAMSYS FUNMAT HT 3D Printer. Industrial grade PC (Polycarbonate) was used in the manufacturing of the control units.
Prior to 3D printing, SAIC Yanfeng used machining processes and techniques to fix these control units to the base structure of gauges. The downside of such approach was low precision when positioning each unit on the base structure. Consequently, the gauge production process was more time-consuming and led to low productivity.
Through 3D Printing, a unibody structure of all control units is made possible and result in higher production efficiency while meeting all gauge’s functional size requirements. INTAMSYS FUNMAT HT 3D Printer is capable of achieving position accuracy of X/Y: 12.5μm and Z: 1.25μm, hence is chosen by SAIC Yanfeng for its gauge components development and production.
“Getting started with INTAMSYS was straightforward for SAIC Yanfeng. Dimension of the control units is 198 x 113 x 110 mm. By leveraging on 3D printing solutions from INTAMSYS, my team 3D printed the control units in only 2 days. SAIC Yanfeng managed to significantly reduce time needed for gauge development and production. As a result, SAIC Yanfeng witnessed vast improvement in productivity, faster turnaround and lower production costs.” said the Gauge Project Manager at SAIC Yanfeng.
Artec’s 3D scanners are indispensable tools, used through- out all of product’s lifecycle stages. Ranging from creating prototypes to reverse engineering, or making a 3D model for quality control analysis of data, 3D scanning is vital to achieving the fastest workflow. Artec’s 3D solutions provide both impressive accuracy and the ability to capture an object in 3D at speed, while the smart post-processing software, Artec Studio is able to handle large amounts of data automatically in order to create the 3D model. Moreover, due to the portability of the 3D scanners, they can get to an object’s hard to reach places.
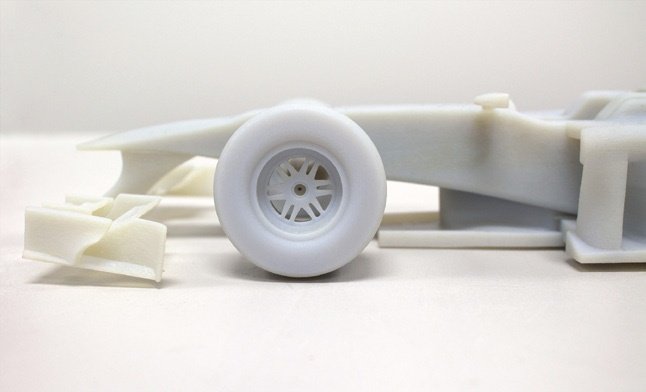
Using 3D scanning for reverse engineering was recently demonstrated in a project initiated by a Birmingham-based tool manufacturer that tasked Artec’s British partners Central Scanning and a leading supplier of CAD & CAM solutions Delcam with making a scale 3D replica of their F1 car so it could be 3D printed at a size of approximately 300 mm.
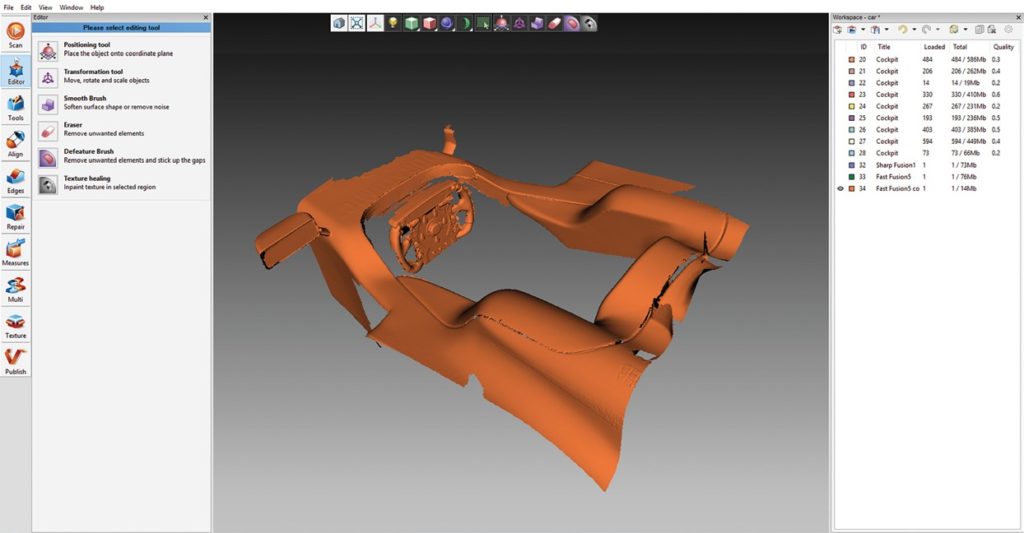
The car was 3D scanned and the collected data was processed in Delcam’s advanced reverse engineering software package PowerSHAPE. The main body of the car was captured using a Steinbichler Comet L3D, and then the driver’s cockpit, steering wheel, wishbone suspension, rear spoiler, wing mirrors and areas that could not be easily reached with Steinbichler Comet were 3D scanned with the powerful Artec Eva.
“This scan was done by us as a test to see what could be achieved using two types of scanning systems. We selected the Eva because of its portability and speed, plus we do not need to add markers, it easily follows the graphics”
Paul Smith of Central Scanning
The car was 3D scanned in the owner’s reception area and workshop; both areas had good stable lighting but no direct sunlight because this would affect the data capture. There were some dark carbon fibre areas around the wishbones – those were sprayed very lightly. Light reflections around the spoiler areas were also sprayed lightly to ease and quicken the capture. Paul recommends a few tips on how to capture car parts easier.
“Adding something behind the wishbone suspension units, like paper with graphics, enables the scanner to track the texture and capture the geometry of the thin wishbone. We liked using Artec Eva because it needed no calibration and was quick to set up and capture in these tricky areas.”
Most of the data was processed using standard settings and without texture during global registration to speed up the process. The Artec and Steinbichler big data sets were then merged in PolyWorks.
As James Slater of Delcam explained, “The front and rear fins of the car were modelled as solids, created by taking sections through the mesh, extruding them and then merging the separate pieces together using simple Boolean operations. This work was actually done by a summer placement student, who had only had one week’s training before embarking on the project. Meanwhile, one of our more experienced engineers was tackling the more demanding surface construction needed for the body. The end result was a fully detailed, hybrid surface and solid 3D model that would be virtually impossible to make using any other software. Of course, one of the most important things in any RE project is to have a high quality, accurate mesh to start with.”
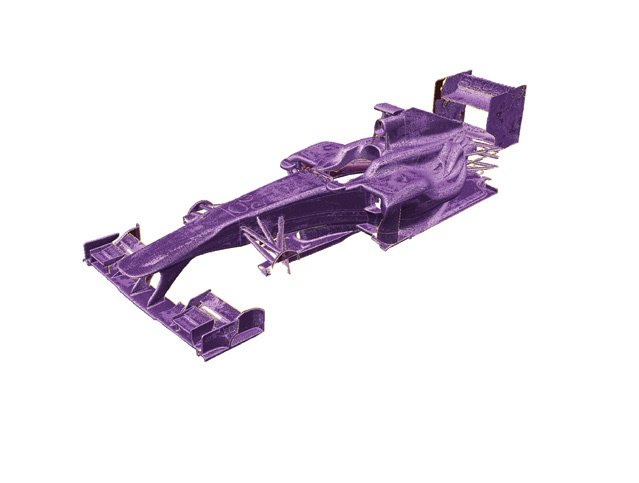
The completed 250 MB STL 3D model, approximately 8.5 million triangles, was then fully reverse engineered at Delcam using PowerSHAPE Pro. Complex doubly-curved regions were most suited to surface modelling, while more prismatic parts could be formed most efficiently using solids.
The car was surfaced at full size. Once it was scaled down, some of the thinner areas, in particular the wishbones and spoilers were thickened up in PowerSHAPE. The digital copy of the car was then 3D printed on Objet Eden 500V with a print layer of 0.016 mm.
Dan Dement has been in the jewelry business for nearly fifty years, the last sixteen making custom jewelry for customers at his Stone Oak Jewelers store in San Antonio.
Being in Texas, Stone Oak specializes in bling. “Very few of our rings have fewer than 200 stones in them,” Dement explained.
Using traditional handcrafting methods, it would normally be difficult for a store like Stone Oak to compete with the Big Box retailers on the types of jewelry pieces popular in his market.
But Dement doesn’t use traditional methods. An experienced jeweler, Dement is also a self-professed “gadget freak,” and he has one of the most technically advanced operations around.
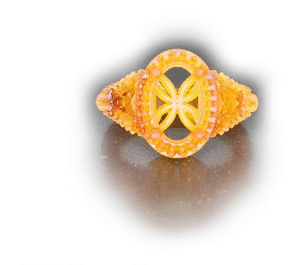
Stone Oak uses the latest design software and an EnvisionTEC Perfactory 3 Mini Multi Lens 3D printer to make accurate, detailed jewelry patterns, which are then used to make an investment casting that produces high-quality, finished jewelry for his customers — within a week.
“A handmade jeweler can’t achieve what we do in a typical piece,” Dement said of his high-tech operation. “Can you imagine asking a jeweler to sit down and make a piece that has 200 stones and 800 prongs and make them all exactly the same?”
While Stone Oak offers jewelry in a full range of metals, about 80% of its custom- made jewelry pieces are palladium, which is in the platinum group and regarded as one of the more difficult metals to cast. But Dement finds that his EnvisionTEC 3D printer produces models in just the right low-wax polymer to develop a high-quality investment casting with exceptional detail. That, in turn, delivers exceptional final results.
“Highly talented jewelers want to believe that handcrafting a complex ring from eight or nine or ten pieces is the only way to do it,” Dement said. “That’s wrong, and in my opinion such a ring is not as good as a solid casting. CAD and the ability to grow the model and cast it in one piece give you a much more solid ring without putting a million hours into it.”
Industry Experts Explore the Possibilities
Dement’s experience with 3D printing started about ten years ago when Dement visited GemVision, the world leader in CAD/CAM tools for jewelry, both then and now. Dement had provided diamonds to GemVision for use in promotional films and wanted to check out their operation.
Immediately, the technology-lover became intrigued by the company’s equipment and rapid prototyping processes.
GemVision’s Travis Serio — “the most knowledgeable guy in rapid prototyping machines,” Dement said — told Dement he thought he could direct cast platinum and palladium with EnvisionTEC’s equipment and resins.
“Nine years ago, no one knew how to do this,” Dement recalled. “Against everybody’s advice except Travis’, I went on the quest of being able to direct cast platinum, palladium, and even rhodium.
“I got an EnvisionTEC Mini machine, and I was able to direct cast these metals using their PIC-100 resin for the patterns. We’ve been doing it now for nine years.”
Quality 3D Printing Materials Matter
In order to develop a quality investment casting, which leads to a quality final product, Dement said jewelers need to use the right technology, materials and take the time to understand their features, properties and the trade-offs.
Dement said Serio was using a low-wax polymer to build his detailed patterns. Dement caught on, explaining, “it’s easier to cast resins with a big wax base, but a bigger wax base doesn’t allow you to get the detail you can get with a more plastic- like resin. The less wax, the more detail you can model.
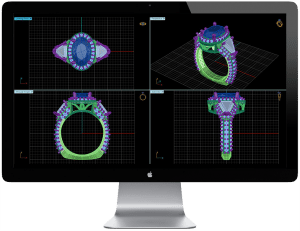
After a friendly consultation, Stone Oak Jewelers starts all of its custom projects by designing the metallic portion of the piece using CAD software. Next, they’ll show the customer a 3D wire frame preview from all angles.
“Almost all of our rings have dozens of diamonds, complicated galleries, and many other features you just can’t get with a wax-based growing material. We’ve stuck with EnvisionTEC’s PIC-100 resin. It has always worked very well.
“Our precision is pretty much dead on. We don’t have a lot of shrinkage or expansion the way we do it. We don’t have a problem with it when we’re measuring diamonds and so forth. It’s pretty much exact. You hear about people who have to scale up their materials 3% or scale it down 4%. We don’t do any of that.”
On the other hand, other adjustments are sometimes needed. For example, Dement said, “Higher resolution resins expand when you burn them out and this can crack the investment, especially in a bigger ring. You also have to heat your oven to fourteen-hundred to fifteen-hundred degrees Fahrenheit. So we ended up getting a special, super hard investment for our work. It’s harder than concrete.”
The system delivers exceptional results.
Understanding Materials Extends to the Metals
Understanding the materials used for 3D printed models, Dement said, is just as important as really understanding the scientific properties of metals and how they cast differently.
“The business has gotten much more technical and it’s what you have to do to stay ahead of the game,” Dement explained.
By mastering material properties, as well as the technologies offered today, Dement and Stone Oak Jewelers have found a way to stay ahead of the competition.
After a client visits to discuss a new jewelry concept, Stone Oak uses GemVision software to create a 3D model within a day. On any given night, the team may send 20 custom models to the EnvisionTEC Mini to be printed. The next day, they can then show the resin model to the customer, allowing them to try it on or make modifications.
“If they like it, we invest it and cast it and they can see it in metal the next morning,” says Dement. “Then depending on how complicated the piece is, it takes us two to three days to get it finished. So we strike pretty quickly. A lot of jewelers take four to eight weeks. That’s significant, because in the jewelry industry, if you give customers too long to think about it, they change their mind and want to make changes.
“We made custom jewelry for six years without 3D printing. So we know it’s much more profitable to do things this way. If something doesn’t come out right, or the customer does want to change something, you just make the change [to the digital model], grow it, cast it, and get on down the road. You don’t have a gazillion hours times two into the job.”

Once a customer has approved the design, Stone Oak sends the CAD file representing the metallic portion of the piece directly to the EnvisionTEC Mini machine, which prints a highly accurate version of the jewelry in PIC-100 resin in a few hours.
The next day, Stone Oak casts the piece in the desired metal. After finishing, Stone Oak presents a delighted customer with the finished, custom jewelry.
Minimizing inventory also contributes to profit
The 3D printing model also allows Stone Oak to combat one of the industry’s longstanding challenges – the high cost and low turnover of inventory.
“We have 200 sets in our cases, but we still end up making 95% of what we sell in any given year,” Dement said. “It doesn’t matter what you make or buy, you’re never going to sell half of it through the year. We make up some silver and cubic zirconia samples of things we’ve made in the past as show pieces. But we don’t have to invest in new inventory. The ability to design a new piece, make it, and have it on your finger in a week, eliminates the need to pour money into inventory.”
Ultimately, a digital manufacturing system has enabled Stone Oak to compete more successfully. Dement recently sold the successful business to his son-in-law, Mike Bowling, who has been with the company for years.
“Big stores don’t want to go up against us because they buy everything in China and can’t customize anything,” he said. “We’re also fighting internet merchants selling basically brown, grainy, milky diamonds. But I don’t see how little shops can survive today without going the route that we have gone.”
“Even with the Texas oil business suffering, we’ve been able to maintain our sales volumes and improve our profitability. Everyone else I talk to is behind last year.
“So I think the proof is in the
pudding: Digital manufacturing works for us.”
3D Printing and Casting Tips from a Pro
Dan Dement of Stone Oak Jewelry in San Antonio, Texas, has tips for casting platinum group metals with 3D printed models.
First, Dement said jewelers need to drop their reliance on tradition. “Jewelers want to do it like they’ve done it for the last twenty or thirty years and that’s not necessarily what works best,” Dement explained. “What works for silver doesn’t necessarily work for gold, which doesn’t work for platinum, and doesn’t necessarily work for palladium.”
Take milgraining, that row of tiny beads or hemispheres along the edge or boundary of a section of jewelry. “A lot of guys say they only want to milgrain by hand,” Dement said. “We grow our milgraining with the EnvisionTEC. It holds up better when you cast it in rather than try to put it in by hand. But some jewelers think you worship the devil when you take these shortcuts. Most jewelers are creatures of habit, and often their own worst enemies.”
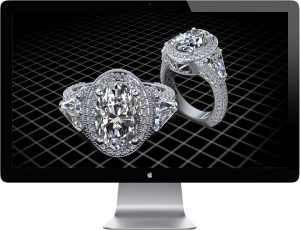
Above, an example of the type of custom work a digital system enables at Stone Oak Jewelers in San Antonio, Texas. The jeweler uses GemVision CAD/CAM software, an EnvisionTEC 3D printer and quality investment casting.
Second, Dement said jewelers need to invest in the right equipment to get quality results. “Our EnvisionTEC machine was $80,000 back when we bought it and it’s still going strong,” he said.
“The better machines just hold up,” Dement said. “We’ve run it almost every night for nearly ten years and had only one service call that whole time. Everybody today wants to buy a cheap machine. Well, that’s kind of like having a pickup truck. If you’re trying to pull a 40-foot trailer that’s maxed out, a quarter-ton truck ain’t gonna last.”
The same goes for Stone Oak’s casting machine. It was $40,000. “That’s pretty much how we do everything, across the board,” Dement said. “We’re always at the top edge of technology and trying to find the best people.”
Third, follow best practices and keep your eyes open for new technical advances.
See Original Study at EnvisionTEC
Bay View Dental Laboratory in Chesapeake, Virginia, is a family business, and although it’s a mid-to-large lab, with 50 employees, after 75 years in business, it still maintains an intimate family feel.
Today, a group of second- and third-generation of Shafers are carrying the torch into the future.
Some time ago, Matt Shafer said the company realized 3D printing would be a necessary part of a competitive future for their dental lab, which serves dental customers nationwide.
“We have a lot of different technologies,” Matt explained, “but we had been hesitant to pull the trigger on a 3D printer. There were people who told us it was a waste of money, but we went forth.”
In the end, he’s glad they did. The venture into 3D printing, Matt said, has gone “better than we had expected.”
The company researched a variety of 3D printers before settling on its EnvisionTEC Vida as its primary 3D printer for precision production work. The machine offers great flexibility for printing everything from castable patterns for highly accurate crowns, full contours, inlays and onlays to surgical guides and bite splints to full models. The Vida, he said, also offers simple cleanup and post processing.

The EnvisionTEC Vida 3D printer for dental professionals offers improved resolution to 73 μm, a variety of dental-specific material options and a slightly larger work space.
Initially, Bay View tried a competing 3D printer. “We were not happy with the post-processing,” Matt said. “We used it for two weeks and said, ‘That’s not going to happen.’”
By comparison, he said, the EnvisionTEC “is just an easier process for us.”
The Vida was installed at Bay View in August 2016 and Matt said the process went very smoothly. “I am a ceramist, but I spearheaded the 3D printer into our workflow,” Matt said.
Bay View is using its Vida to print in several materials:
- E-Dentstone Peach, for highly accurate dental model manufacturing. With a similar look and feel to gympsum die stones used in labs, it can be trimmed and marked and it’s tough enough to have a technician remove and replace the die and check occlusion.
- Press E-Cast M, for direct investment casting of copings and crowns.
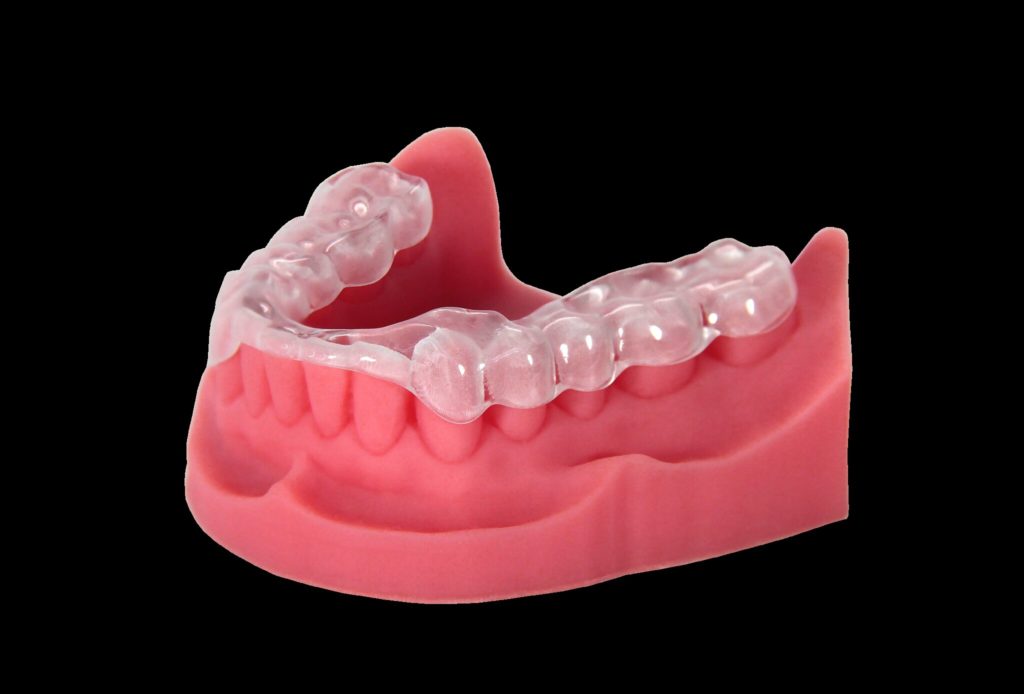
- E-Guard, a biocompatible transparent material for the production of bite splints, night guards and surgical guides.
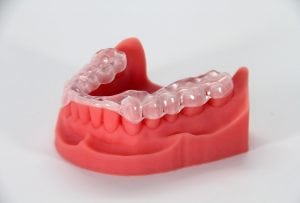
E-Guard material printed on an EnvisionTEC 3D printer for dental applications.
The accuracy and material flexibility offered by the Vida has allowed the company to expand its business in offering surgical guides, too. “It’s a growing business,” Matt said.
Interestingly, Bay View also owns another 3D printer, a cheap model from Formlabs, which sits right next to the Vida in the lab.
“It is not to the standard quality of the Vida,” Matt said, calling it “adequate” for jobs requiring less accuracy where time isn’t crucial. “I thought it would be faster than it was, that it is. I’m also not thrilled with the material options that we have with it.”
But for Bay View, the Vida is the quality standard in the lab, offering incredible accuracy, surface finish that requires little to no post-processing and flexibility that cannot be matched in terms of the material library and potential uses.
“The overall accuracy on the Vida is better,” Matt said.