
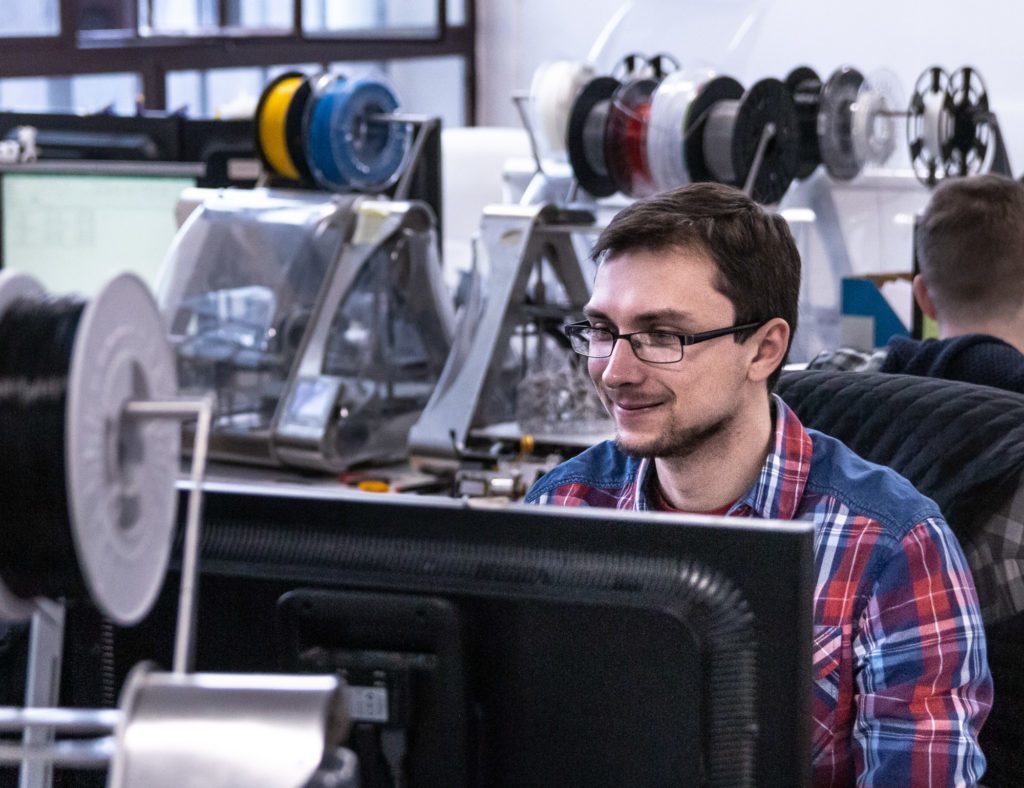
“Filament” is a commonplace word in the 3D printing community. But, if you’ve never heard the word, what would you think it is? Filament could be described as any material in a wire-like form. If you reference a dictionary, it is defined as a slender threadlike object or fiber– especially one found in animal or plant structures. It is also defined as a conducting wire or thread with a high melting point that forms part of an electric bulb or vacuum tube– heated or made incandescent by an electric current. While these are common definitions, they do not describe filament as we use it in 3D printing. The filament that we talk about in 3D printing is made from a variety of different source materials. Currently, the most common filament is PLA (polylactic acid) which is derived from corn or sugarcane lactose based polymer. The other most common filament is ABS (acrylonitrile butadiene styrene) which is derived from a petrochemical stream. These materials both print on 3D printers and are used most commonly. Today, there are more versions of these materials from manufacturers than can be listed here. Formulations have changed– they have been combined with other materials. They are refined and reformatted to become composite materials that are both the same and different than the primary constituent material.
All filaments are not created equally. Many manufacturers do not produce filament to the same standards. Low quality filaments can have minor to devastating effects on your prints and printer. Having a high tolerance diameter through the entire length of the spool is crucial to printing successfully. Fluctuations in diameter can lead to uneven prints, under extrusion, clogged nozzles, and more. Even if filament is manufactured to a consistent diameter, it must be wound, packaged, and stored correctly. If it is wound incorrectly, it can get cross linked and prevent filament from unwinding off of the spool. This leads to print failure. Many of these materials are hydroscopic (water absorbing)– meaning that they must be stored in a dry environment with silica for moisture absorption or they can become very brittle and difficult or impossible to print with.
Nothing is more important than quality filament if you are relying on it for prints for customers. These were hard lessons to learn as a new business. When we started 8 years ago, supplies of filament were scarce and expensive. At that time 3D filament was somewhat novel and could only be ordered from a couple of online outlets. The first spools of filament that we received reminded us of large spools of weed whacker material. Often when people ask us what the material was, that is how we described it. Of course, we quickly learned that it required attention to keep it wound and stored carefully.
Filaments are made in two diameters. There are printers that only print with one or the other diameter. Some ponder this as a mystery of the 3D universe. However, there are some differences that true 3D nerds discuss. According to some print enthusiasts, 1.75mm prints result in higher detailed prints on multiple sized printers. This is in contrast with 2.85mm (sometimes labeled or marketed as 3mm) that doesn’t print details as well but prints faster. This is a lively discussion in some 3D groups. However, if you have a printer that prints with one size, that is probably what you stick with that simplifies your filament choices.
What is important about filament is its printability– from the beginning of the spool until the end.
If we could distill the many important lessons we have learned throughout years of experience down to a few points, they would be the following:
- Buy good filament. This will save you money in the long run by having a higher success rate and remove the headache of trying to untangle bad material, bake out moisture, or clean out extruder assemblies.
- Ensure that the material is packaged and stored correctly at your location. This means making sure to not let the spool unwind by pinning the end of the filament to the reel– either through a hole provided on most reels or by taping it to the side.
- Prevent moisture from prematurely ruining your reels once they are opened. This means putting them in an airtight container with desiccant. It will prolong the life of your supply– especially the more exotic materials that don’t get used as often.
- If you can see it, check the manufacturing date. No matter how much you try to prevent moisture from ruining the material, it will eventually still find its way in. If the material is very old, there is a high likelihood that you will have some issues with it for printing.
- If you can, grab some calipers and sample your supplier’s material every so often. Measure the diameter of the filament across different points on the reel in order to check and see what the fluctuation in the diameter is. If it is within +/- 0.05mm of the labeled diameter, chances are that you are okay. If it’s anything outside of that, consider reaching out to your supplier or switching materials.
- Before trying any new supplier or filament type, run some small prints to nail down the print settings and verify the quality of the material before starting any significant, lengthy prints.
The few extra dollars that you spend up front for good filament will be worth the money you will save from having successful prints more reliably.
As always, The 3D Printing Store team is available to provide demonstrations, professional development courses, and educational courses to you and your team. Please contact arausch@the3dprintingstore.com for inquiries.
3D printing is able to accomplish incredible designs that would be extremely difficult or impossible to machine. There are many benefits to this including: increased strength, weight reduction, assembly costs reduction, waste reduction, and more. Naturally, people want to see these benefits realized with materials other than plastic. Metal, ceramics, and more have all been added to the catalog of materials suitable for 3D printing due to increased interest and research. However, most metal additive manufacturing technologies require very different and expensive technology when compared to many of the plastic additive manufacturing technologies. Metal additive manufacturing (AM) primarily uses high powered lasers or electron beams to create parts. While this technology is impressive, it can also lead to many problems. This has led other printer and material manufacturers to investigate technologies that could be used to achieve metal parts at much lower production costs. Recently, there have been several companies to succeed in doing so. This article looks at the current drawbacks as well as new technologies that are helping democratize metal AM and may even allow users to print metal parts on their own home desktop printers.
Powder Bed Fusion Metal AM
To better understand the deterrents associated with many of the metal AM technologies, it is first useful to understand how they work. Most of the metal AM printers available on the market are powder bed fusion technology printers. Powder bed fusion (PBF) printing describes several similar additive manufacturing processes which all use some high energy source to carefully melt fine metal powder together layer by layer. This is accomplished by raking a precise thickness of material across the print surface and allowing the energy source (typically a laser or an electron beam) to draw out the layer. Once the layer is complete, the build plate moves, another layer of material is raked across the top, and the process is repeated. Once the print is complete, the excess powder is carefully removed– usually with compressed air and can be recycled with new material at a specific ratio specified by the tool manufacturer. From there, the part can be sintered for further strengthening. The whole process is very fascinating and it results in strong, beautiful parts. However, the process also has some aspects that make it undesirable.
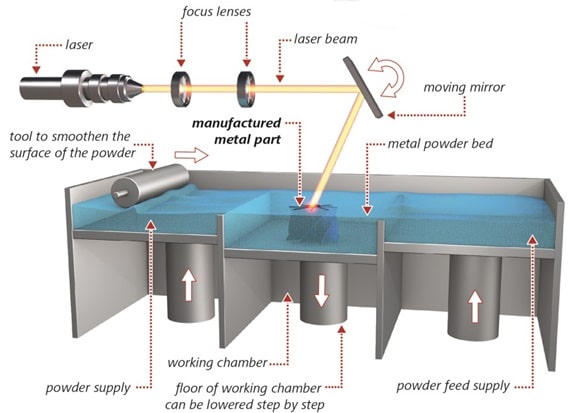
Metal powder is dangerous to work with as inhaling it is damaging to the lungs. It is also a skin and eye irritant. This means that anytime it is being handled, it must be done so with care to ensure the operator’s safety. Also, due to the packed bed technology, excess powder must be removed. While this material can be recycled, it must be mixed in with fresh material at a certain rate which leads to additional waste and expenses. The sophistication of the technology also comes with a price tag. High power energy sources are expensive pieces of equipment, and if they break and require replacement or repair, it is very costly. Also, they are expensive to run. Selective laser melting (SLM) machines are hundreds of thousands of dollars– making them accessible only to large companies that can afford the high upfront price tag. Additionally, setup and removal are difficult as changing between materials is cumbersome and part removal from the print bed usually requires machining to remove. Even operating the machines requires extensive knowledge of the specific metal material properties that are being printed in order to get the right amount of power to effectively melt the powder together.
PBF metal AM certainly is impressive and definitely has its use cases in industries such as aerospace, manufacturing tooling, automotive, and more. However, it is hard to justify the price and complexity for many jobs for people just looking to create functional prototypes, art pieces, or many other applications. On the other hand, fused deposition modelling (FDM) printing is cheap, easy to operate, and safe to use. Several companies have realized this and successfully developed materials and processes to print metal parts much more easily.
FDM Metal AM
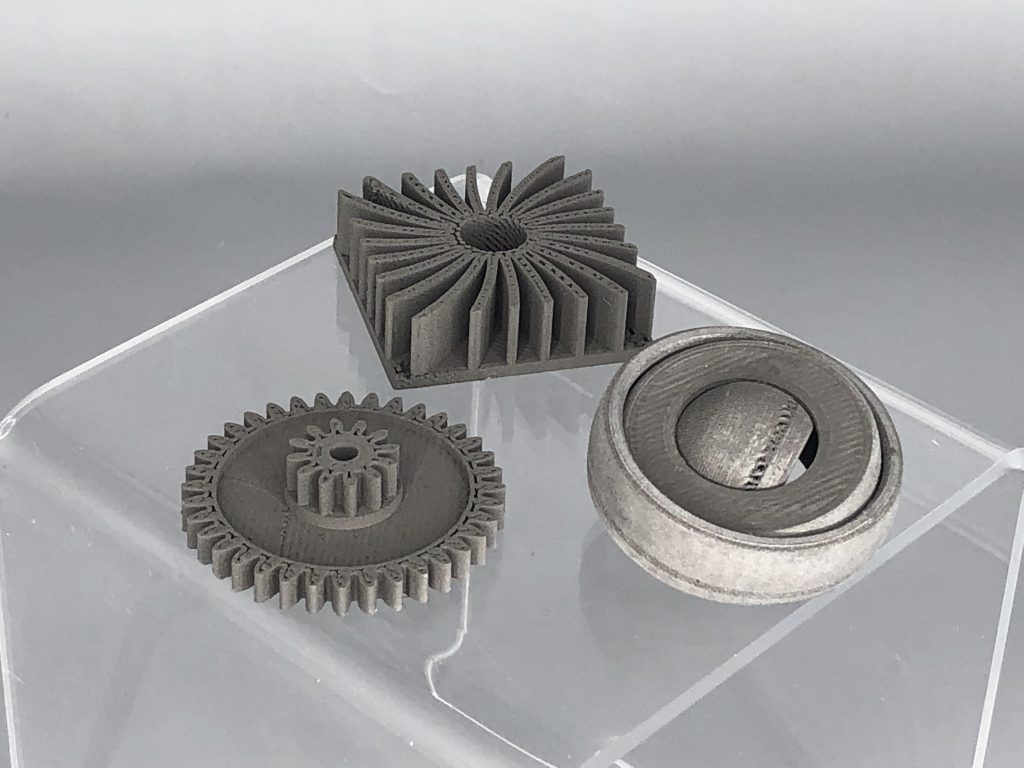
FDM printing is something that most people are familiar with by now. It is a fairly simple process. Filament of a specified diameter is pulled through a hot nozzle at around 200-300° C for most materials while the nozzle is moved in 3 axes to deposit material creating a part. But with such low nozzle temperatures, how can you print metal? Most metals melt at well above 1000° C! The clever way that this is circumvented is by creating plastic composites such as polylactic acid (PLA) with fine metal powder dispersed within the material. The weight of this being that with minimal modifications to the machine (a hardened steel or jewel tip nozzle), any desktop FDM printer can be used to print a metal part, including printers as cheap as the $200 Creality Ender 3. One company who The 3D Printing Store has worked with, and has seen great success in their materials catalog, is Virtual Foundry.
Using their bronze filament material, we have printed several parts on an 8 year old Makerbot Replicator 2 and seen similar success with many of our other printers using different materials.The price of printing parts is a factor of 10x cheaper than PBF printed metal parts. Since the powders are dispersed in plastic, safety is also no longer an issue. While support material is required, there is significantly less waste than PBF metal printing. Additionally, switching between metals is as easy as switching between any other material on an FDM printer. The parts can also be sanded after printing to achieve a higher quality surface finish. Once the parts are completed printing, they can also be sintered in order to remove the excess plastic deposited as well as strengthen the bonds between the metal particles. This results in a strong metal part that can be used for functional applications.

Some of the materials that are available are:
- Aluminum 6061
- Bronze
- Copper
- High Carbon Iron
- Inconel
- Stainless Steel
- Tungsten
- Titanium
… and more.
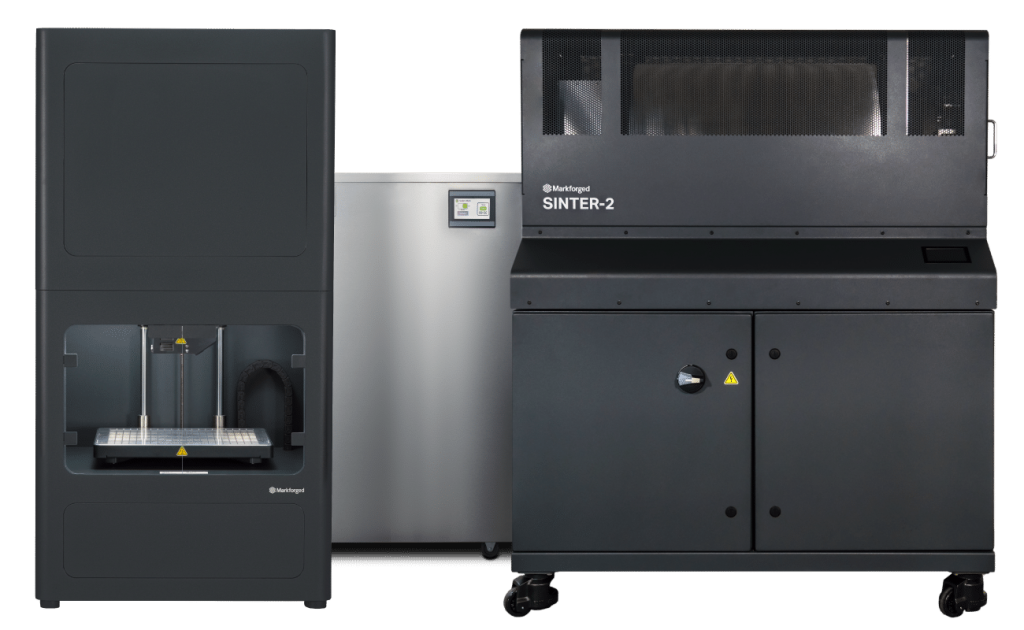
There are also other options that have a closed ecosystem such as the Markforged Metal X. The Metal X is a full metal system including the materials profiles, printer, sintering oven, and wash. It is more expensive than an at home FDM printer, but still less expensive to produce parts than using PBF printing.
It is important to note that FDM metal parts are not the same strength as machined parts, or even PBF printed parts, even after sintering. Due to the porosity inherent to the FDM printing method, the metal particles are not as strongly bonded. However, for applications without stringent mechanical and strength requirements, it is a great technique for achieving high quality complicated metal parts. Also, other interesting material properties are still captured when using this material as well. Examples are radiation shielding from Tungsten, conductivity from copper, or even oxidation of bronze. FDM metal printing accomplishes many of the same functions as PBF printing at a fraction of the cost– allowing more people to develop, prototype, and manufacture their next idea.
Metal AM has come a long way in a short time, and I think that we will continue to see it grow even more. The ability for people to now bring metal parts to their desktop printers has the potential to change product development; it is exciting to see products, art, and ideas come to life, shaping the future of manufacturing. In the same way that AM democratized the plastics manufacturing industry, it is now expanding into metal fabrication, ceramics, and more. While it is not a direct replacement for PBF metal printing or traditional metal manufacturing such as casting, forging, etc., it is a suitable replacement for many applications at a significantly cheaper price.
If you would like to print your next part in metal and realize the benefits of real functional metal parts, contact us at project@the3dprintingstore.com. To purchase your own virtual foundry metal filament, visit their website at https://www.thevirtualfoundry.com/
Originally written by Michal Swoboda for ZMorph
Electronic circuits are almost everywhere nowadays. They are on your wrist and in your pocket, they hide in your car, and even are present in space! Therefore there is a growing number of electronic enthusiast who wants to fulfill their creativity using knowledge and proper tools for making the most outstanding things they can imagine! But how circuit boards are made?
Different Types of Circuit Boards
For most it’s all starts with the idea schematic – a kind of how it works graph, that uses proper symbols for resistors, capacitors and so on.
Then it’s time for making your idea come to life. Well, there are few ways you can achieve that. Let’s start from the bottom.
You could just solder parts together using their terminals and some wire to get a messy spaghetti connected in mid-air like some sort of monster (that could still work).
Secondly, you can use breadboard that’s easy to modify and doesn’t require soldering but suffers from its fragileness. It’s easy to disconnect something and it’s often really big, and as it gets bigger, often get messier.
Next thing you can do is use a “universal board” that’s similar to a breadboard but requires soldering, which makes it more reliable if you want to utilize your circuit. The downside of this kind of board is the fact that you need to connect all the elements using wires. The bigger the circuit is the more wire is needed, and this leads to a lot of work needed to complete a circuit
Last but not least, we’ve got so-called Printed Circuit Boards or PCB for short. What’s that and why it’s the essence of all electronic circuits?
What is a PCB?
PCBs are boards that are dedicated to one special circuit that you have created, the biggest upside of such boards is the fact that they are extremely reliable, can be fitted in your design perfectly (enclosure, chassis, etc.), and lastly you can use Surface Mounted Devices (SMD) that can shrink the whole circuit a lot!
However, how do you make it? Making circuits nowadays is done using a Computer Aided Design (CAD) software, there’s are a lot of programs to choose from but I personally strongly recommend KiCAD. Using your idea schematic, you lay down tracks between components’ terminals and defining your board shape, usually, it’s a rectangle but with PCBs, you can go with lots of shapes like circles, triangles, rings, stars, banana? Why not!
Making a Custom PCB
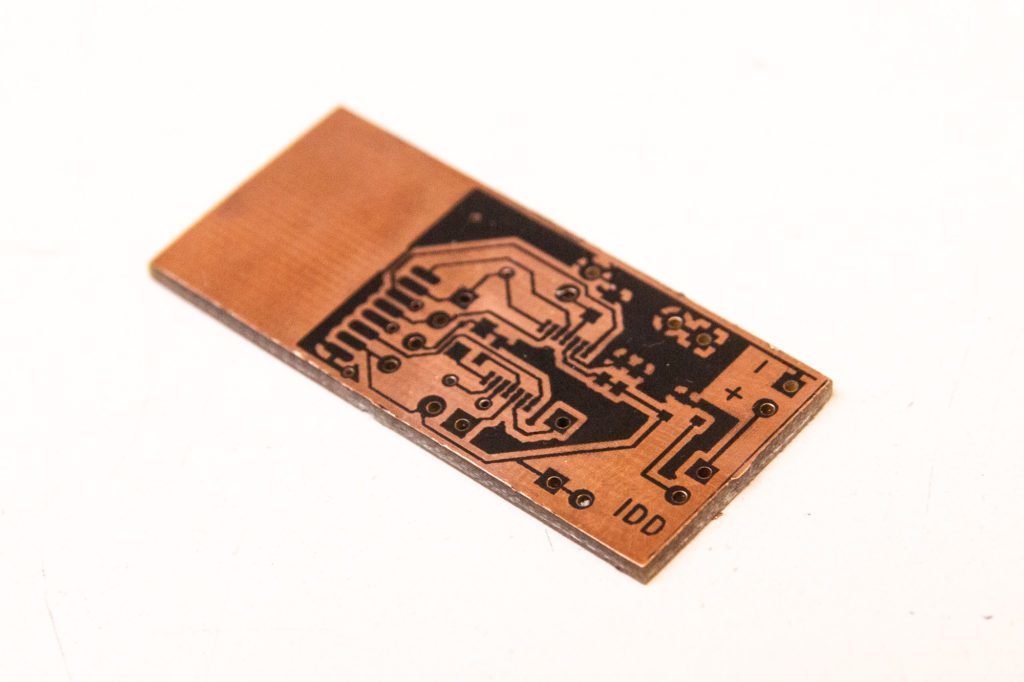
You’re done designing an electronic circuit, but you would like to have a physical board. So how do you do it? Again, you’re not limited to just one solution. You can use various DIY methods to do this (like the Iron method), this way you can have your PCB ready at the same day, but these methods often lead to multiple tries to get a good result. It really might be frustrating. And there’s a big chance that the thinner the track the more likely it is that it won’t be properly created.
Custom PCB made on ZMorph VX
ZMorph VX and PCB Making
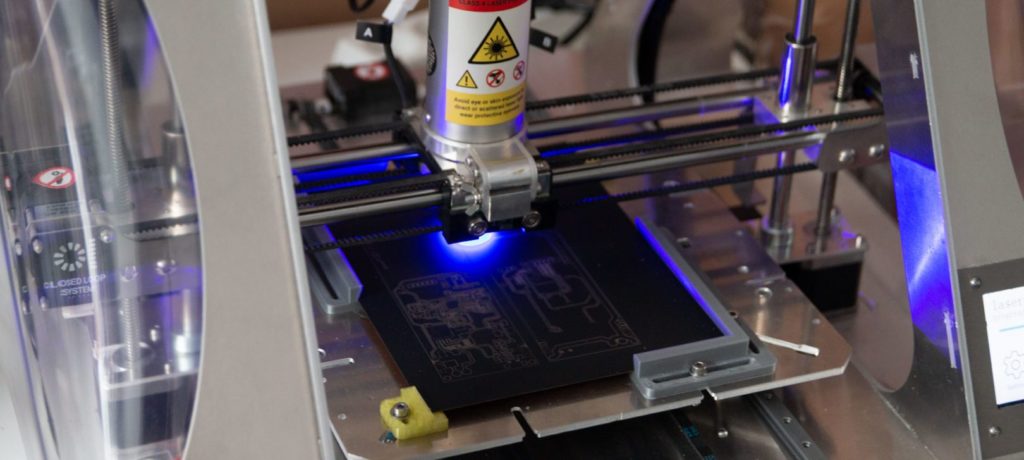
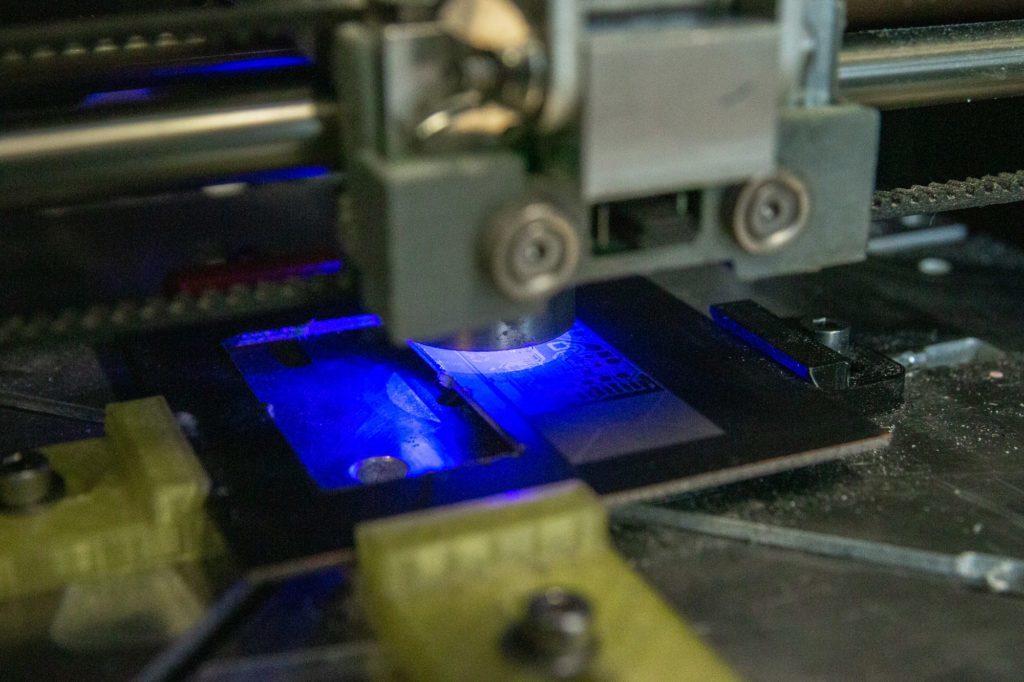
So are there other methods? Of course there are. You can utilize the versatile ZMorph VX for a rapid manufacture of your own Printed Circuit Board. For some of You readers, you’re familiar with milling PCB tracks using spindles. But here at ZMorph, we’ve taken a different approach. Because of multiple toolheads, we asked ourselves a question. How would the laser work, for creating tracks? There is a way to make a custom PCB with the Laser PRO toolhead and we came across a simple solution.
Making a custom PCB on ZMorph VX
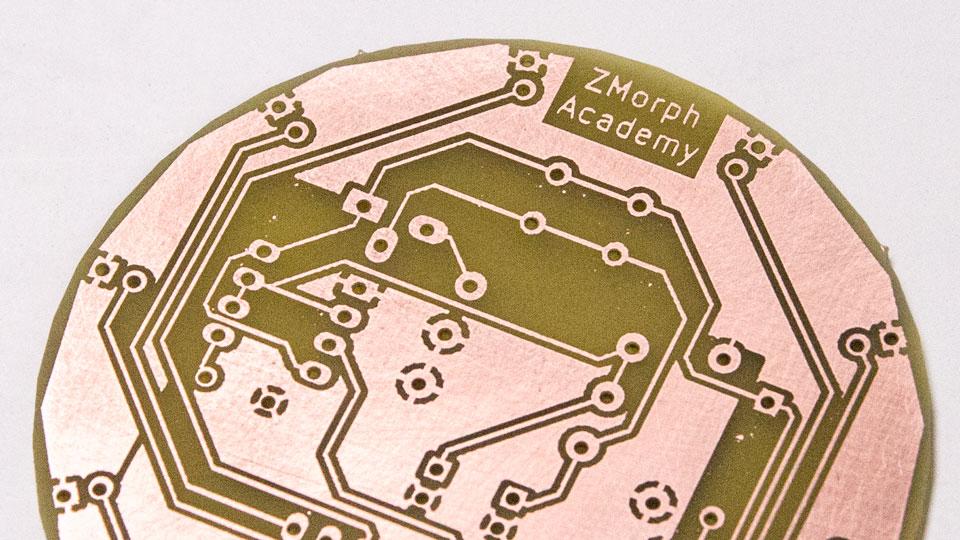
Let’s cover an ordinary FR-4 copper laminate with a thin layer of ordinary matte black spray paint. That way laser beam evaporates paint leading to the revelation of copper. The laser method is easy to use, we just need to set toolhead to a proper height, which doesn’t need to be precisely trimmed. That way we can obtain a laser beam of diameter approximately 0.12 mm.
According to simple math, if our laser beam is that thin, theoretically we can achieve spacing between tracks of 5 mils. This is really tiny! And almost impossible to get in other DIY methods.
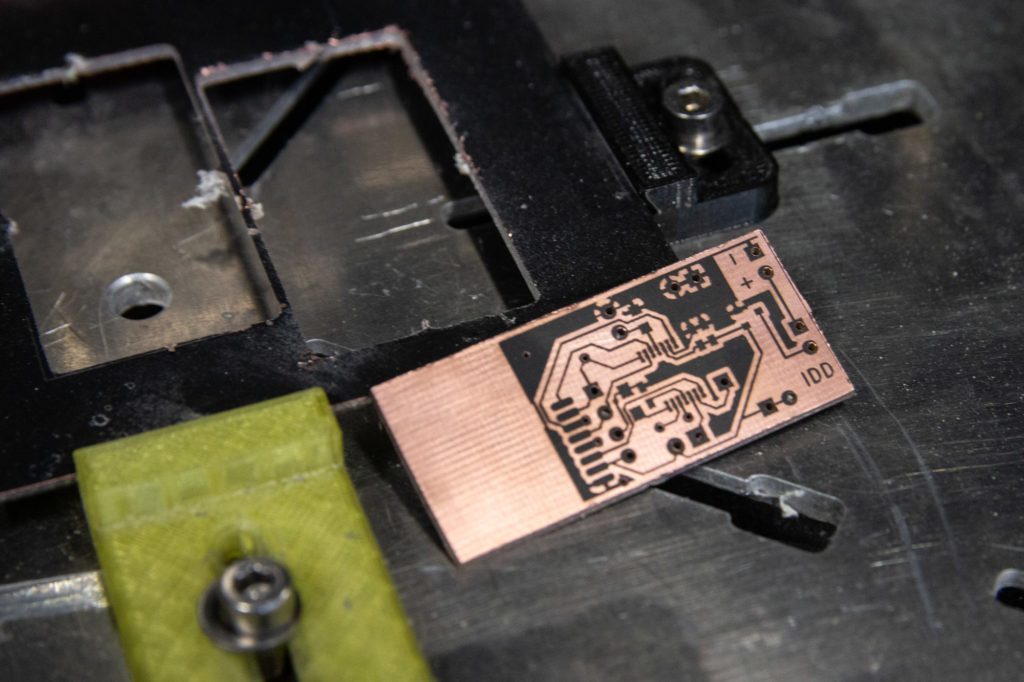
After creating laser tracks, we can switch to CNC PRO toolhead, do a little positioning check and then drill holes and mill cutout of our board. There still exist some nasty leftovers from paint evaporation process, but using a pencil rubber nice and easily gets rid of that.
Now PCB is almost ready, we just need to bathe it in the etching solution. Thanks to prior rubbering, the chemical reaction between copper and solution should be fast. All the revealed copper should be etched from the board. There’s only one last step you need to take. Clean up the spray paint with some solvent. Here you go! You’ve got yourself a PCB that’s ready for soldering.
Custom PCB made on ZMorph VX
How long that it took? 2-4 hours? And for more than 80% of the time the things were done by itself! Time factor of this solution is outstanding, that’s why most of electronics prototypes that our R&D department creates are done on ZMorph VX.
If you want to get better knowledge about all processes and learn how to make a PCB using ZMorph VX, please visit the Advanced Course at ZMorph Academy.
Michał Swoboda is an engineer and Embedded System Developer at ZMorph. He works at R&D department and is constantly testing new products and working on different electronics.
Click here to see the original post.
Original article appears on www.ITPro.com
What is 3D Printing?
Are you having a hard time understanding what 3D printing is and how it can benefit your business? We’re here to help! 3D printing is the manufacturing process of converting digital blueprints into physical objects. Printing in 3D happens in much the same way as traditional printing – instead of a text file, a digital schematic is used to map out a physical object, which is then built up layer-by-layer using a variety of materials. This process is regarded as ‘additive’, whereby the object is created using only as much material as is required for the job. Compared to processes that machine an object down into something usable, this massively cuts down on waste. Aside from this basic principle, technology dictates how 3D printing is applied in industry. Desktop printers will use plastic toners, which are melted down and then laid out onto a designated platform, while larger industrial printers make use of metal powder that is selectively targeted with high-heat lasers. Rubber, metal alloy, sandstone, and even meat-based products can be used as materials – and the list is constantly expanding.
Is it Popular?
Although 3D printers remain some way off becoming an everyday consumer device, the technology is no passing fad. More than 278,000 3D printers were sold worldwide in 2015, according to the latest Wohlers Report – almost double that of 2014. In the last two years, 3D printing sales have grown by 99%. The additive manufacturing industry has seen a growth of 25.9%, surpassing $5.2 billion in revenue. Although the total number of sold 3D printers may seem relatively low, the majority of current customers are within large companies and startups with big pockets. Where is it used? So far, the technology’s biggest successes have been in industrial applications. It is extensively used in car manufacturing, particularly higher end prototype products or Formula 1 racing, where its customizability is seen as a strength. Aerospace pioneer SpaceX is able to create engine parts using 3D printing without the substantial lead times that traditional processes place on deployment, speeding up the process dramatically. And the field of architecture has been transformed through the use of 3D printing, where individual architects can create scale models directly from their own CAD designs, instead of using artists. Engineers, prosthetic designers, shoemakers, and even drone hobbyists are taking advantage of the flexibility that 3D printing affords.
What are its Benefits?
As the finished product is 3D, the technology allows designers to create complex shapes and intricate parts that would otherwise be too delicate to produce conventionally. Complexity in design adds no extra cost to additive processes, making it possible to work around current limitations. Printing schematics act like normal files, which can be shared between computers and printers. So long as you have the correct toner to create the item, the printer files, such as spare product parts, can be downloaded from websites and sent straight to the printer. The entire process is also highly cost effective, which is particularly useful for startup businesses looking to prototype new designs on small product runs. Design changes can all be done within the schematic, avoiding the need to contact manufacturing plants to adjust the blueprint.
What are its Drawbacks?
Most drawbacks are due to the infancy of the technology. Although the list is expanding, you are currently restricted in your choice of materials and colors. Most consumer parts are printed in grays or whites before being painted by the user, and the finished products lack the strength associated with traditional manufacturing. Precision is also somewhat limited, as 3D printing is unable to produce the wafer thin designs that some products require.