
Video Transcript: Let’s look at the basic layout for Fusion 360In the top left, you can find the data panel icon that shows all of your projects as well as some useful samples and instructions. This information is stored on the cloud as well and can be accessed from any computer at any time.
Next to that, denoted by the paper, is the file icon that provides some basic high-level functions within the software including creating new designs, uploading files, exporting files, etc. Next is the save icon, that allows you to save your work as a Fusion 360 file directly to the cloud. After that are the undo and redo icons allowing the user to step backwards and forwards through changes they’ve made.
Directly to the right of these icons are the current design tabs. Several designs can be worked on at once and the separate designs are stored on these separate tabs. Next, are notifications and job status. These allow the software to communicate with the user about any software issues as well as any updates. Next is the user account information. This allows the software to change between users and save and load user settings. And beside that is the help icon which allows the user to search for specific help.
Video Transcript: Hello, my name is Alex Rausch and I am an engineer with Accucode 3D. At Accucode 3D, we aim to help people with their design and printing needs by offering design services, educational material, 3D printing services as well as reselling machines.
Additive Manufacturing, or 3D printing, is a transformative way of manufacturing, but a major barrier to the industry has been the inability for individuals to design their own products. This video aims to help people understand what CAD software is and how to use it. Accucode offers design services and will work with you on your designs to improve them. But this video should give you an understanding of how to start a design.
First, let’s start off with what is CAD? 3D Designs are generally created using a 3D CAD, or Computer aided design, program. For our design video we will be using Autodesk Fusion 360. This is because Fusion offers some unique advantages, it is cloud based software so the appropriate people in your organization can easily share files and view them from anywhere, and also it offers a free startup license for companies making less than $100,000 a year allowing for hobbyists and startups to create their designs for free.
If your organizations make more than this there is also a paid license version at a reasonable price of $495 a year per user. There are many popular CAD programs out there and each offers some unique abilities however, many of the underlying functions operate similarly between all of the software. This video series does not aim to give you an idea of every capability every software has but rather introduce you to how a typical file is designed and some of the basic functionality.
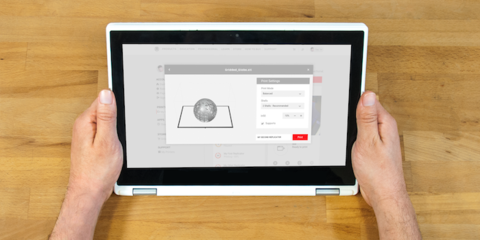
MakerBot is proud to now offer cloud-based 3D printing with the new My MakerBot. This in-browser platform connects your networked 3D printers, Thingiverse accounts, orders and support cases all in one place.
Upload and prepare files, print, then monitor their progress from any device, anywhere. An important new tool for schools, My MakerBot will broaden student access to 3D printers in Chromebook classrooms and makes it easier for educators to manage their use.
How to use My MakerBot
- Connect your MakerBot 3D printer via wifi or ethernet.
- Using MakerBot Print or the MakerBot Mobile app, add and authenticate your printer.
- Login to My MakerBot to see all of your authenticated printers.
- Upload an STL file, choose your settings, then print.
(Courtesy of Makerbot.com)